You are a Shopify store owner, but probably, you have bought products online for once. Remember the time we ordered something online, one of the thrills of that shopping process is waiting for your product while knowing exactly when it will arrive. The online shopping experience can sometimes feel like a waiting game. Customers place their orders, but long anticipation of not knowing when those packages will be delivered can prevent them from completing the purchase and end up in abandoned carts.
That is where estimated delivery times enter the scene. This feature not only delights customers more but also creates trust and openness between the store and its end-users. An estimated date for delivery sets expectations clearly and thus reduces customer inquiries while increasing overall satisfaction.
In this blog post, we’ll explore what this feature is, why it’s essential, and how to add delivery date in Shopify store.
What is the Estimated Delivery Time (EDT)?
Shopify Delivery Time, or Estimated Delivery Time refers to a feature that provides some form of estimation, either in date or time frame, concerning the delivery of ordered items to customers.
In an online store, this piece of information can show on the Product Page, Checkout Page, or Shopping cart. With this feature, the shopper knows exactly when they can expect to receive the order after it’s placed. That is normally calculated based on several factors, which include:
- Shipping origin
- Destination address
- Chosen shipping method
- Order processing time
- Carrier transit times

Why does Shopify Delivery Time matter?
In this competitive e-commerce world, every online store is working hard to create the most quick and convenient shopping experience for their customers.
The Shopify Delivery Time can become a powerful assistant to compete with other competitors. When setting this Estimated Delivery Time, you do not just set a date on the calendar, you create a promise to your customer. More than that, this little buddy can:
- Reduce cart abandonment: One of the most common cart abandonment reasons is hesitation over the shipping time. Not everyone is ready to commit to a delayed delivery process. Knowing when the delivery of a particular purchase will take place will encourage shoppers to complete their purchases.
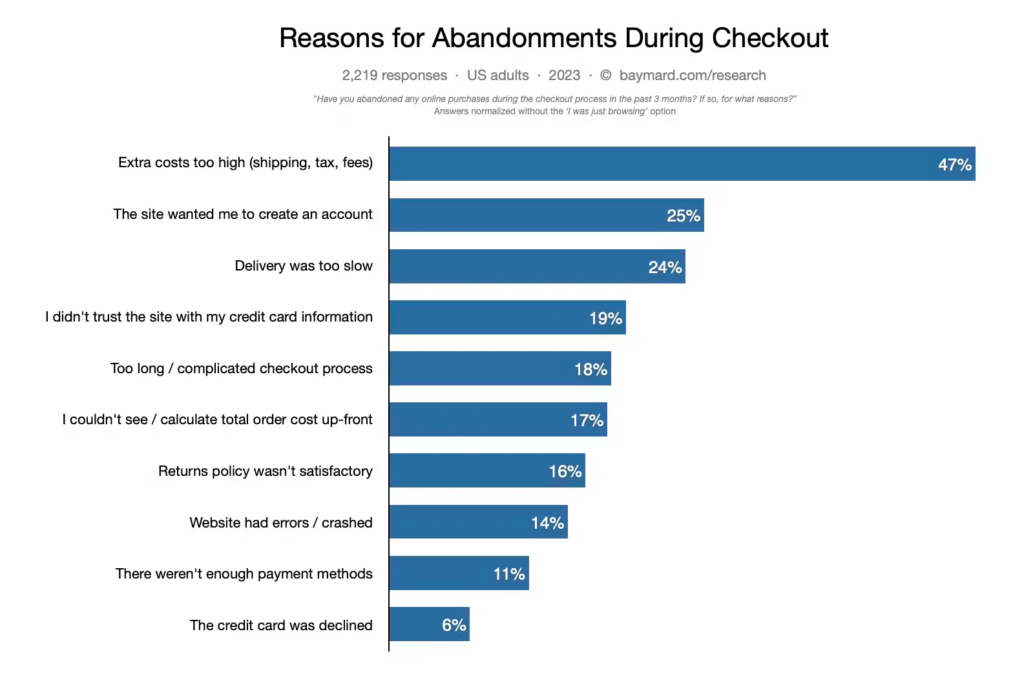
- Provide better customer service: Shopify delivery time helps your store set realistic expectations and prevent disappointment for your customers.
- Competitive advantage: Quick delivery times can be one of the huge differentiators in this crowded e-commerce landscape. In essence, that gives many businesses an edge over others, especially those that have longer delivery times, and those who neglects the power of the Shopify delivery date feature upfront.
- Reduce workload: According to an Australia Post survey, if the package arrives late, but still arrives by the estimated delivery date results in 76% fewer customer contacts compared to delayed deliveries without a specified delivery date Shopify. This significantly reduces the workload for the team, freeing you up to concentrate on other crucial aspects of your business.
- Boost conversions: By providing clear information about delivery times, you build trust with your customers and reduce uncertainty in the purchasing process. The transparency, the lower cart abandonment rate, and the better customer experience, all together support the increase of conversion rate.
Where to show your Shopify delivery date to maximize the impacts?
Here are three key touchpoints where displaying delivery estimates can significantly enhance the shopping experience:
- Product Pages:
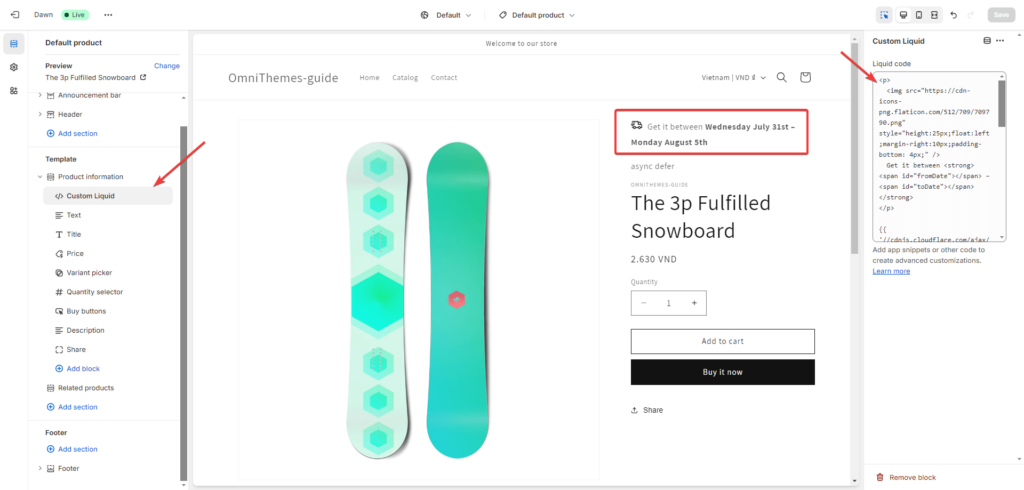
Displaying the estimated delivery date right on the product page helps the customer be more aware before they add items to their shopping cart. This can be particularly useful for customers who need products by a specific date or are comparing delivery options across different stores.
Additionally, transparency created by showing the Shopify delivery date can influence their decision to buy the product.
- Cart Page:
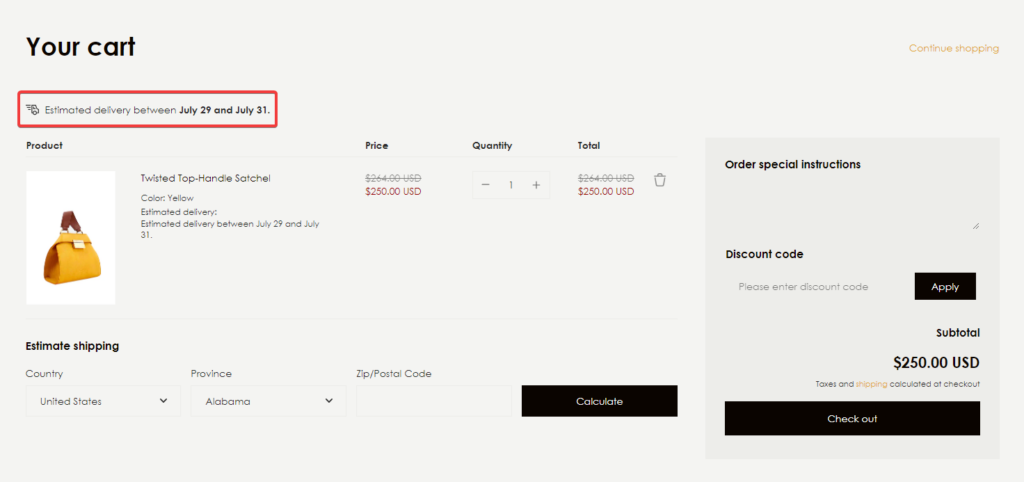
Showing estimates for delivery within the cart gives customers a clearer view of when items could be expected, and may encourage them to complete a purchase or add more items to their cart to qualify for faster delivery options. On the cart page, this information once again reinforces the delivery expectation, reminding the buyers before checkout.
- Checkout Page:
During checkout, the customer will have the possibility to view and approve the estimated delivery dates for their orders. This touchpoint then represents the final moment in setting clear expectations in your shipping process and underscores the crystal-clear expectations within the post-purchase experience.
Thus, the Shopify delivery date appears at this time giving your customer more confidence and certainty to complete their purchase.
Setting an estimated Shopify delivery time at these critical moments could help you create a much more informed and confident customer shopping experience, potentially reducing friction and increasing conversion rates, not to mention customer satisfaction.
How to add the estimated Shopify delivery time to your store?
Let’s explore how you can implement this feature in your Shopify store. There are several methods available, depending on your store’s eligibility and technical requirements.
Method 1: Shopify’s native delivery dates feature
Shopify offers a built-in delivery dates feature, but only for eligible merchants. This native solution provides a straightforward way to display estimated delivery dates without the need for additional apps or custom coding.
By setting up this way, your Shopify delivery dates are displayed in several places like the checkout and accelerated checkout such as Shop Pay, order status page, order confirmation email, and thank you page.
To check if your store is eligible to set up this feature, take a look at the considerations and requirements to set up delivery dates from Shopify. If your store is eligible, you need to do the following to display it in your store:
- If you use legacy shipping settings, then you need to update your shipping settings.
- Set up processing time.
- Set up your shipping rates for any of the following: flat shipping rates with transit time, Shopify Shipping calculated rates, negotiated carrier-calculated rates
For more detailed instructions, refer to the Shopify Help Center guide. Once set up, Shopify will automatically calculate and display estimated delivery dates based on your configurations and real-time carrier data.
Method 2: Add the Shopify Delivery Time feature with Theme.
If your store isn’t eligible for Shopify’s native delivery dates feature, don’t worry! Shopify has solutions for everyone, not just eligible vendors.
Some Shopify themes, like the Eurus Theme, already include the estimated delivery date feature. If your current theme supports it, activating this option could be the simplest solution for your store. If not, consider switching to themes like Eurus.
Recognizing the importance of this function, Eurus Theme has integrated this feature directly into the design. So by using Eurus Theme for the Shopify delivery time feature, you’ll also enjoy these benefits:
- Easy setup: Among the options, this is the most effortless option. Since you can quickly add this small box of delivery information, with the help of the detailed document guidance and the support team. Therefore, you can easily display it, without any coding or hassle of learning to use a new application.
- Display at critical touchpoints: Eurus offers strategic placement options for delivery date information. You can show it on various “turning points” of the customer buying decision journey such as product pages, and cart pages, and checkout pages.
- Seamless integration: The display of the delivery date will be integrated into the looks of your theme in such a way as to provide consistency throughout the store. As a result, you can save time and effort, no need to worry if you are not a design expert.
- Free to customize: Even if you want to twitch the looks and feel of your Shopify delivery time element, there are tons of options on Eurus Theme for you to do so. Adjust fonts, colors, positioning, or the content, anything to tailor it to your preferences.
- Speed up your store: Eurus Theme is built for speed and performance, which is extremely important for any Shopify store owner. You can speed up your store, and free yourself from the concern of a slow web experience when using third-party applications or adjusting the store’s code.
- Feature-rich: After purchasing Eurus, you will not only benefit from the estimated delivery date feature but also acquire other sets of features that are built for Shopify store owners such as Quick View, Mega Menu, etc. Get instant updates for the newest technology without any extra fee.
To start using the Theme with the built-in Shopify delivery time feature for FREE:
- Go to the Shopify Theme Store
- Browse or search for the name of your desired theme (Eg. Eurus).
- Select the theme you want to go to the listing page.
- Click “Try theme” to add it to your Theme library and start using it.
- Simply follow the theme instructions to set up your delivery date settings.
Method 3: Using Shopify Apps
Another popular method guide on how to add a delivery date in a Shopify store is by using third-party apps from the Shopify App Store. These apps often provide advanced features and customization options beyond what’s available in native solutions or themes with no built-in features.
Some popular Shopify apps for estimated delivery dates include:
- Estimated Delivery Date ‑ Plus by Coder
- Omega Estimated Delivery Date by Synctrack
- EDDer: Estimated Delivery Date by Channelwill
- Estimated Delivery Date ‑ ETA by SetuBridge
To add an app for estimated delivery dates:
- Go to the Shopify App Store and search for “estimated delivery date” or “delivery date calculator.” Among available options, read the reviews for an app that will suit your needs.
- Click “Add app” to install the chosen app to your Shopify store.
- Simply follow the in-app instructions to set up your delivery date settings.
- Test the app in the store to ensure everything works fine.
When choosing an app, make sure to put factors such as pricing, features, compatibility with your theme, and customer support into detailed consideration. Also, the site’s speed and performance are other important aspects that you should take an eye on to ensure your website is optimized for SEO and creates a satisfied customer experience.
Let’s upgrade your store with accurate delivery estimates!
In today’s competitive e-commerce landscape, every detail can create a big influence. Shopify delivery time is not just a nice-to-have feature. It is a game-changer in providing clear and accurate estimated delivery dates that can significantly enhance your customers’ shopping experience and set your store apart from the competition.
Whether you choose to use Shopify’s native delivery dates feature, leverage the built-in capabilities of themes like Eurus, utilize third-party apps, or implement a custom solution, adding estimated delivery dates to your Shopify store is a valuable investment in your business’s success.
Don’t let uncertainty about delivery times hold your business back. If you’re looking for a Shopify theme with great design and all the modern shopper’s features in demand, Eurus won’t let you down. Upgrade to the Eurus theme today and start providing your customers with the clear, accurate shipping information they crave.

