Creating a sense of urgency has proven its effectiveness as a marketing tool to boost sales in Shopify stores. To not stay behind the competitors, it is your turn to learn How to add a countdown timer on Shopify. By displaying a ticking clock that counts down to the end of a promotion or sale, you send a clear message to your customers: “Act now, before it’s too late!”.
In this article, we’ll explore the benefits of using a Shopify countdown timer and provide step-by-step instructions on how to add one to your store.
What is a Countdown Timer on Shopify?
A countdown timer is a digital clock on a website that displays the time remaining until a specific event or deadline (often a flash sale). In the context of Shopify stores, countdown timers are used to highlight limited-time offers, flash sales, or product launches.
- What is the purpose of the Shopify countdown timer? These timers create a sense of urgency and scarcity, encouraging customers to make quicker purchasing decisions. This fear of missing out (FOMO) can be a powerful motivator for customers, leading to increased conversions and sales.
- Where does this countdown clock often appear? These timers are typically displayed prominently on product pages, cart pages, or pop-ups.

Why is it important to add a countdown timer on Shopify?
Let’s explore some of the key benefits of the presence of this psychological tool – a countdown timer – in your Shopify store.
- Adds to the urgency: Picture this: You’re shopping online and come across a flash sale ending in 2 days. You might not pay much attention. But what if you see a countdown ticking away: 40 hours, 30 minutes, 2 seconds? You might feel like something is missing and act fast. Apply this to your customers. Shopify countdown timers can increase the likelihood of customers buying something before the opportunity is lost.
- Creates FOMO: Countdown timers tap into the fear of missing out, which has proved to be a strong decision-making driver for so many customers. According to OptinMonster, 60% of millennials say they impulse buy after experiencing FOMO, usually within the first 24 hours.
- Increased Conversion Rates: In fact, according to a study by the Aberdeen Group, the incorporation of countdown timers generated a 14% increase in the click-to-open rate and a 10% lift in conversion rates in emails without a timer. This idea applies to your Shopify store as well for a boost in your conversion rates.
- Anticipation: Countdown timers can build anticipation for upcoming product launches or events that may be special to your customers, and help you to enhance your marketing campaigns.
It is undeniable that this little feature can create a strong impact on your online store. Now, let’s move on to the next part and unveil the secret of how to add a countdown timer to your Shopify store!
How to Add a Countdown Timer to Your Shopify Store: 3 ways
There are 3 effective ways to add a countdown timer to your Shopify store that will be mentioned in this guidance. Depending on your technical skills and preferences, you will find the most suitable method for your store.
Method 1: Using a Shopify Theme to add Shopify countdown timer
Some Shopify themes come with built-in countdown timer functionality, allowing you to easily add timers to your store without the need for additional apps or code. One outstanding theme is Eurus, which offers countdown timers that can be used in pop-ups, promotion banners, announcement bars, and flash sales.
4 steps to add a countdown timer on Shopify with Eurus Theme:
- Step 1: Visit the Eurus Theme page, click the “Try now for FREE” button, then tap on the “Try theme” button to add it to your Shopify store.
Note: You must log in to your Shopify store to add the theme.
- Step 2: In Shopify admin, go to Online store > Themes > click Customize button on the Eurus Theme.
- Step 3: Depending on the purpose of your promotion and the design of your store, you can add the Shopify countdown timers in 4 different types of sections. Find the section you want to add and read the corresponding part to know how to add a countdown timer in each kind.
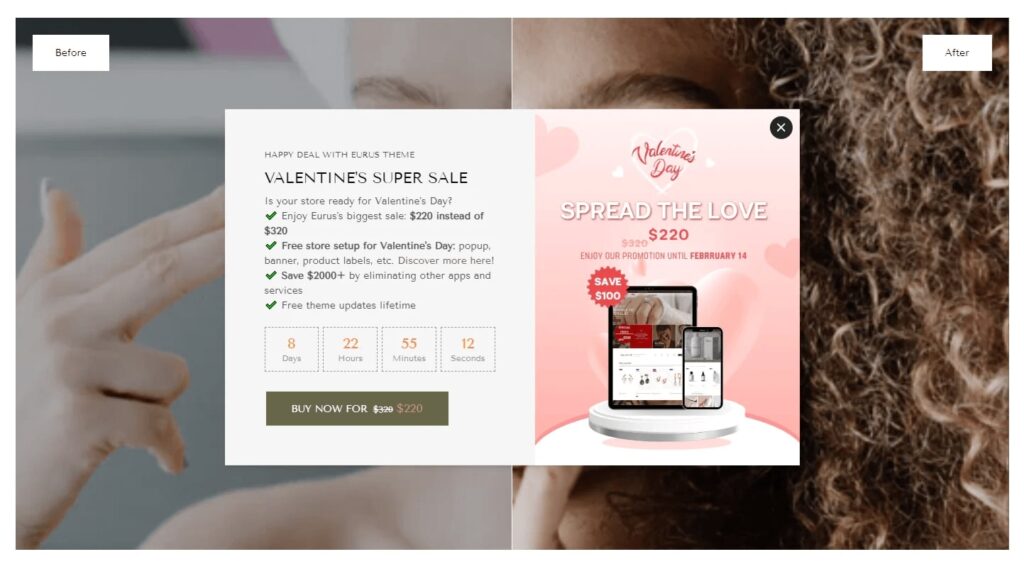
Section type 1: Pop-up
Scroll down to Overlay, under the Popup section, add a block called Countdown timer.
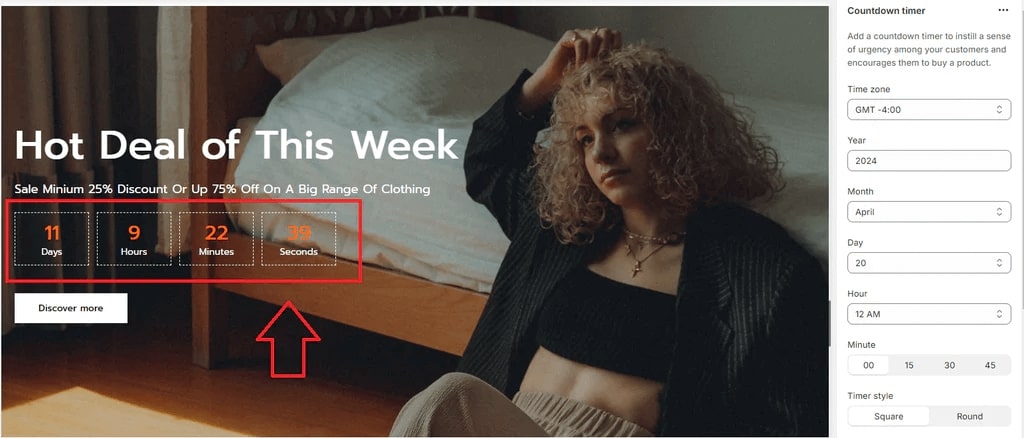
Section type 2: Promotion banner
Add a new section called Promotion banner to your desired places, under this section, add a new block named Countdown timer.
Section type 3: Announcement bar
Under Header, find the Announcement bar section, add a new block named Announcement, then insert “{count_down}” in the Text box.

Section type 4: Flash sale
Add a new section called Flash sale, click on the block that says Countdown timer to edit the setting.
- Step 4: Click Save to save all the changes and preview your storefront.
While we’ve highlighted Eurus as an example, many other Shopify themes offer similar functionality. When choosing a theme, consider countdown timer features as part of your decision-making process.

Method 2: Use a third-party App to add a countdown timer on Shopify
If your current theme doesn’t include countdown timer functionality, or if you need more advanced features, Shopify apps are an excellent solution.
5 steps to add a countdown timer using an app:
- Step 1: Visit the Shopify App Store and search for “countdown timer”
- Step 2: Choose an app that fits your needs and budget & install the app.
- Step 3: Embed the app into your Shopify theme.
- Step 4: Follow the app setup instructions to customize your timer’s appearance and settings
- Step 5: Test the app’s performance and release the setting.
Some popular Shopify countdown timer apps include:
| App’s name | Developer | Rating | Pricing | Main features |
|---|---|---|---|---|
| Hextom: Countdown Timer Bar | Hextom | 4.9 ⭐ (1,443) | Free to $9.99/ month | Customizable timers for products, collections, and store-wide sales. |
| Essential Countdown Timer Bar | Essential Apps | 4.9 ⭐ (748) | Free to $29.99/ month | Add timers to the product page, top bar, banner, and cart page. Customizable with flexible schedule options. |
| FOMO: Sales Countdown Timer Bar | GoodApps | 4.9 ⭐(216) | Free | Offers a counter timer, promo bar, sales counter, and sale timer popup. |
These apps offer flexibility and additional features like:
- Customizable Styles: Tailor the appearance of your timers to match your brand aesthetic.
- Multiple Timer Types: Choose from various timer styles, such as evergreen timers that reset for each visitor or recurring timers for specific timeframes.
- Advanced Targeting: Display timers to specific customer segments or pages based on their behavior or demographics.
Method 3: Add a countdown timer on Shopify with a manual code
If you’re comfortable with coding, you can manually add a countdown timer to your Shopify store by changing the code inside your theme. This method offers more flexibility and customization options compared to using an app or theme, but it requires more technical knowledge and ongoing maintenance.
You’ll also need to edit the timer code manually whenever you want to change the countdown date or time.
- Step 1: In Shopify admin, go to Online Store > Themes > find the theme you want to add a countdown timer and click on the three dots button > Edit Code.
Pro Tips: Make a duplicate version of your current live theme before making any changes to back up your store in case any conflict or error occurs.
- Step 2: Expand the Snippets directory, click on Add a new snippet, name it “Shopify countdown timer”, and click Done to create.
- Step 3: In your newly created snippet file, copy and paste the following code:
<h2 class=”countdown-timer-heading”>Black Friday sales will end soon!</h2>
<div class=”countdown-timer-container”>
<div class=”countdown-timer-item”>
<div class=”countdown-timer-values” id=”days”>00</div>
<div class=”countdown-timer-label”>Days</div>
</div>
<div class=”countdown-timer-item”>
<div class=”countdown-timer-values” id=”hours”>00</div>
<div class=”countdown-timer-label”>Hours</div>
</div>
<div class=”countdown-timer-item”>
<div class=”countdown-timer-values” id=”minutes”>00</div>
<div class=”countdown-timer-label”>Minutes</div>
</div>
<div class=”countdown-timer-item”>
<div class=”countdown-timer-values” id=”seconds”>00</div>
<div class=”countdown-timer-label”>Seconds</div>
</div>
</div>
//Change your sale page URL here
<!– Shop Now Button –>
<div class=”countdown-timer-button-container”>
<a href=”YOUR_SALE_PAGE_URL” class=”countdown-timer-button”>Shop Now!</a>
</div>
<style>
.countdown-timer-heading {
font-size: 45px;
margin-bottom: 10px;
text-align: center;
color: #333;
text-transform: uppercase;
letter-spacing: 2px;
}
.countdown-timer-container {
width: 90%;
max-width: 600px;
margin: 0 auto;
display: flex;
justify-content: space-around;
margin-bottom: 20px;
background-color: #f9f9f9;
padding: 20px;
border-radius: 10px;
box-shadow: 0 4px 10px rgba(0, 0, 0, 0.1);
}
.countdown-timer-item {
text-align: center;
flex: 1;
}
.countdown-timer-values {
font-size: 70px;
font-weight: bold;
color: #ff4500;
margin-bottom: 5px;
background-color: #fff;
padding: 10px;
border-radius: 8px;
box-shadow: 0 2px 8px rgba(0, 0, 0, 0.1);
}
.countdown-timer-label {
font-size: 20px;
text-transform: uppercase;
color: #555;
letter-spacing: 1px;
}
.countdown-timer-button-container {
text-align: center;
margin-top: 20px;
}
.countdown-timer-button {
display: inline-block;
padding: 15px 30px;
background-color: #ff4500;
color: #fff;
font-size: 18px;
font-weight: bold;
text-transform: uppercase;
border-radius: 5px;
text-decoration: none;
box-shadow: 0 3px 6px rgba(0, 0, 0, 0.1);
transition: background-color 0.3s ease;
}
.countdown-timer-button:hover {
background-color: #e03e00;
}
</style>
<script type=”text/javascript”>
// Counting 2 days from now
const countDownDateTime = new Date().getTime() + 2 * 86400000;
const daysValue = document.querySelector(“#days”);
const hoursValue = document.querySelector(“#hours”);
const minutesValue = document.querySelector(“#minutes”);
const secondsValue = document.querySelector(“#seconds”);
// Run this function every 1000 ms or 1 second
let x = setInterval(function () {
const dateTimeNow = new Date().getTime();
let difference = countDownDateTime – dateTimeNow;
// Calculating time and assigning values
daysValue.innerHTML = Math.floor(difference / (1000 * 60 * 60 * 24));
hoursValue.innerHTML = Math.floor((difference % (1000 * 60 * 60 * 24)) / (1000 * 60 * 60));
minutesValue.innerHTML = Math.floor((difference % (1000 * 60 * 60)) / (1000 * 60));
secondsValue.innerHTML = Math.floor((difference % (1000 * 60)) / 1000);
if (difference < 0) {
clearInterval(x);
document.querySelector(‘.countdown-timer-heading’).innerHTML = “Offer has ended!”;
daysValue.innerHTML = “00”;
hoursValue.innerHTML = “00”;
minutesValue.innerHTML = “00”;
secondsValue.innerHTML = “00”;
}
}, 1000);
</script>
Note: You can ask ChatGPT to request some changes in the content and styles to make the Shopify countdown timer fit your store’s style and campaign.
- Step 4: Under the Sections folder, find the one that you want to include this countdown timer, and insert this:
| {% include ‘shopify-countdown-timer’, %} |
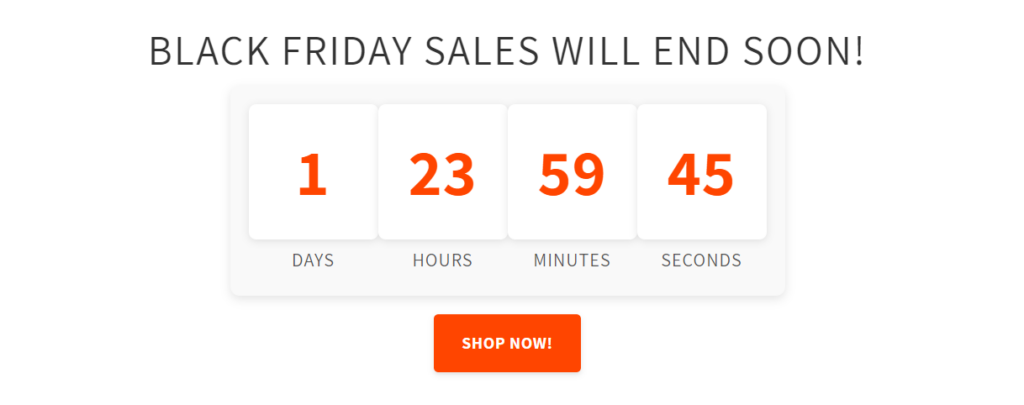
How the countdown timer looks on your Shopify store:
Best Practices for Using Countdown Timers on Shopify
Regardless of which methods you opt for, to make the most out of a countdown timer without finding yourself in the pitfalls, here are some best practices to consider:
- Use the countdown timers sparingly: Do not make every other promotion a countdown timer. The truth is, this only lessens the effectiveness of countdown timers.
- Make sure it is accurate: Remember, countdown timers are meant for transparency to customers, not to mislead them by giving impossible time constraints.
- Give time to decide: Allow customers sufficient time to make their choices without feeling rushed or becoming victims of manipulative tactics. Avoid countdown timers that expire too quickly.
- Countdown timers incorporation in the wider marketing strategy: Implement countdown timers as part of a broader strategy. Experimentation will help you deduce what works best for your business.
- Test different varieties of positions for placing your countdown timer. Placing timers on product pages, cart pages, and pop-ups will have maximum effect. You can add each of them in one go or in some time, and track the results using different tools.
- Combine with Other Tactics: Place countdown timers along with limited stock indicators or with messaging of an exclusive offer; this will maximize the impacts and hence drive more sales.
By following the best practices, and choosing the proper methodology for adding the countdown timer to your Shopify store, you will create a feeling of urgency, increase sales, and thus make their experience much better.
Other related posts:
- How to Add Shopify Age Verification: 3 Easy ways To Add It On Your Store
- How to add custom product options on Shopify
Final Words
Now you know how to add a countdown on Shopify with 3 different methods, the question is which one is the most suitable for your Shopify store?
As a Shopify seller, you are competing with thousands of other sellers who constantly do everything they can. And if you ignore the power of countdown timers, your promotion is definitely going to be less attractive than other merchants, who already added a countdown timer on Shopify.
Whether you have chosen a theme already equipped with functionality, like Eurus, use a third-party Shopify app designed for that, or code it yourself, the key is to implement timers strategically and in alignment with your brand and customer experience.
This way, when implemented by best practices and as part of your current marketing strategy, maximum efficiency can be expected and positive changes noticeable in in-store performance.
For more information on how to add useful features to your Shopify stores in the most simple and effective ways, follow us on Omni Themes.

